I have a need to use VirtualDub filters when scheduling TV captures with V2CRS. I always find that with the Sharpen filter enabled at level 17, my playbacks always look better. I also have a need to enable the Denoise filter as for one particular channel where I live, the reception is not that good. But unfortunately, there is no option for enabling VirtualDub filters in V2CRS.

By luck I suppose, instead of selecting with the mouse, I happened to hit the keyboard and realised that I could key in into the field "Path:" when defining the file to execute for launching VirtualDub (under Preferences -> Capture application) from V2CRS. A thought then came to me - instead of using a .EXE executable file, using a Windows batch file ("VD.BAT" in this case) to launch VirtualDub will give me the ability to use VirtualDub scripts (and hence VirtualDub filters) via the VirtualDub command-line options.
Process Overview
The diagram above depicts a brief overview of my setup. I have let the default state to be where "VD.BAT" will launch VirtualDub without any filters enabled.
In V2CRS, "Preactions" are executed before VirtualDub/"VD.BAT" is launched. By exploiting this feature, I can use a "Preaction" to overwrite the command in "VD.BAT", and thus enabling the desired VirtualDub filter during a TV capture.
"SetDenoiseFilter.BAT" is a Windows batch file that will overwrite "VD.BAT" so that the Denoise filter will be enabled when launching VirtualDub. So, by adding "SetDenoiseFilter.BAT" as a V2CRS "Preaction" for a schedule task, I can be certain that the Denoise filter will be enabled during a TV capture.
By using the same idea, "SetSharpenFilter.BAT" as a "Preaction" will ensure that the Sharpen filter will be enabled during a TV capture.
"Postactions" on the other hand are executed after the VirtualDub/"VD.BAT" application has terminated. Because of this, I am using "SetNoFilter.BAT" as a "Postaction" to reset "VD.BAT" back to the default state.
Setup Instructions
Written below are the instructions for implementing the above mentioned idea. I have installed my copy of VirtualDub in the directory "C:\VirtualDub-1.9.11". If you have installed it in a different directory, just make the necessary modifications accordingly.
You will need to create 2 VirtualDub script files ("Denoise.vcf" and "Sharpen.vcf"), 3 ".TXT" files and 3 ".BAT" files. Those ".TXT" and ".BAT" files are just plain text file containing just a single line. Just open up a text editor, copy the single line of text and paste into the text editor and save the file in the stated directory. I guess I could have done away with the ".TXT" files but I am no Windows batch file programming wizard. So just a quick and dirty solution here.
- In VirtualDub, open the Capture AVI Window (File -> Capture AVI). Make sure that Video -> Filter Chain -> Enable is set..
- In V2CRS, under Preferences -> Capture application, for the "Path:" field key in "C:\VirtualDub-1.9.11\VD.BAT".
- Create a file "VD.BAT" with the following contents using a text editor:
C:\VirtualDub-1.9.11\VirtualDub.exe %*
Save this file in the directory "C:\VirtualDub-1.9.11".
- Create the following 6 files in the directory "C:\VirtualDub-1.9.11\Scripts" with a text editor. There is only a single line in these files.
Filename: SetDenoiseFilter.txt
Content: C:\VirtualDub-1.9.11\VirtualDub.exe %* /s C:\VirtualDub-1.9.11\scripts\Denoise.vcf
Filename: SetSharpenFilter.txt
Content: C:\VirtualDub-1.9.11\VirtualDub.exe %* /s C:\VirtualDub-1.9.11\scripts\Sharpen.vcf
Filename: SetNoFilter.txt
Content: C:\VirtualDub-1.9.11\VirtualDub.exe %*
Filename: SetDenoiseFilter.BAT
Content: copy C:\VirtualDub-1.9.11\scripts\SetDenoiseFilter.txt C:\VirtualDub-1.9.11\vd.bat
Filename: SetSharpenFilter.BAT
Content: copy C:\VirtualDub-1.9.11\scripts\SetSharpenFilter.txt C:\VirtualDub-1.9.11\vd.bat
Filename: SetNoFilter.BAT
Content: copy C:\VirtualDub-1.9.11\scripts\SetNoFilter.txt C:\VirtualDub-1.9.11\vd.bat
- Create the VirtualDub script file "Denoise.vcf" and save it in the directory "C:\VirtualDub-1.9.11\Scripts".
Note: I cannot enable or disable the built in "Noise Reduction" filter in the VirtualDub "Capture Mode" (Video -> Noise Reduction) via VirtualDub a script. So I have decided to use Steve Don and Avery Lee's "Dynamic Noise Reduction" filter instead. Just download the zip file and unzip it into the directory "C:\VirtualDub-1.9.11\plugins". You have to install this filter first before carrying out the steps below.
a. Select Video -> Filters in the main VirtualDub Window
b. In the Filters dialog box, select the "Add..." button
c. Select the "dynamic noise reduction (MMX)" filter.
d. Set the desired "Noise threshold". I set mine at 24
e. Select File -> Save processing settings (Ctrl+S). Name the file "Denoise.vcf".
- Create the VirtualDub script file "Sharpen.vcf" and save it in the directory "C:\VirtualDub-1.9.11\Scripts".
a. Select Video -> Filters in the main VirtualDub Window
b. In the Filters dialog box, select the "Add..." button
c. Select the "sharpen" filter.
d. Set the desired "sharpen" level. I set mine at 17.
e. Select File -> Save processing settings (Ctrl+S). Name the file "Sharpen.vcf".
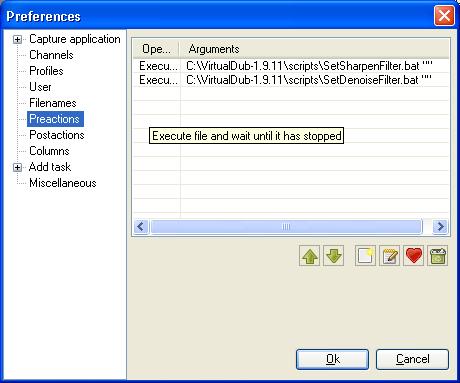
- In V2CRS, under Preferences -> Preactions, add the Preaction for "SetSharpenFilter.BAT" and "SetDenoiseFilter.BAT". Make sure that the operation for each of the .BAT file is set to "Execute file and wait until it has stopped". By defining these 2 Preactions here, we can just select with the mouse the desired filter when scheduling a TV capture.
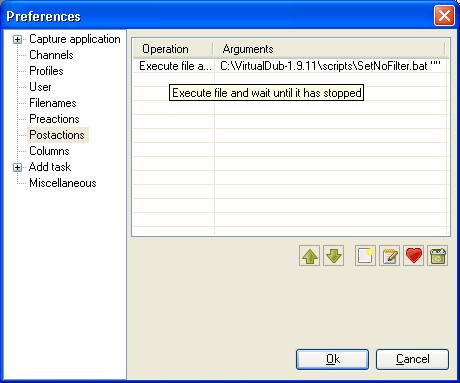
- In V2CRS, under Preferences -> Postactions, add a Postaction for "SetNoFilter.BAT" and make sure that the operation is set to "Execute file and wait until it has stopped". By defining this Postaction here, we can just select with the mouse this Postaction without going through numerous steps in the "Add Task" dialog box.

Scheduling A Task With Filters Enabled
Start V2CRS. Hit the <Space Bar> to add a task. Fill in the Taskname, Channel, etc as you would normally do when scheduling a task. Click on the "Add preaction" button and select the VirtualDub filter that you want enabled from the list of "defined action".
Now add the Postaction "SetNoFilter.BAT" so that "VD.BAT" gets reset back to the default state after the recording.
When the preselected time for the task is reached, 2 applications will be launched - "Cmd.exe" to execute the command in "VD.BAT" and VirtualDub. In the "Cmd.exe" window, you will be able to see the command-line parameters that is being used by VirtualDub.


Hello,
ReplyDeletethis tutorial is very interesting and thank you for you publication...
I'm new of virtualdub and I can't set my filter before capture... I try to set a kind of filter called "alidator.vdf".
Have you some suggestion for do that?
Thanks
Domenico
Hi DomenicoA,
ReplyDeleteI don't use this filter. But I just downloaded it a moment ago and tried this filter in VirtualDub. Glad to say that it works. My captured file looks similar to "alixample.jpg" that is included in the "alidator.zip" file. You need to put the file "alidator.vdf" in the "plugins" sub-directory in VirtualDub -
"C:\VirtualDub-1.9.11\plugins" in my case.
I haven't tried it but I don't see any problems if you were to use this filter with V2CRS. You just have to setup the necessary .BAT, .TXT and .VCF file as I have written in my blog post above Hint: just replace the word "Sharpen" with "Alidator".
Hope this helps.