How I wish that saving my edited video files in VirtualDub2 is as simple as clicking on a single button or option like in Avidemux. Unfortunately, there isn't one.
It took me quite awhile to figure out the parameters and the steps to save my video files in the H.264 format in the MP4 container in VirtualDub2. I use the parameters in the video files that were produced by my cameras as a guide. My uploaded VirtualDub2 post-process videos were accepted by Dreamstime, no rejections based on technicalities. So I assume that what I have done must be correct.
Yes - after a lull of 2 years, I have rekindled my love affair with VirtualDub, albeit with one of its younger siblings VirtualDub2. Not bad considering that I only have a 2GB RAM, Pentium Dual Core 2.7 GHz computer and I could get my video processing done in a reasonable amount of time.
Saving Post-processed Videos
After post-processing, to save the video file, hit the F7 button to bring up the "Save File" dialog.
The "File name:" parameter in this dialog box defaults to the input file name. So, remember to give your save file a different and unique name. Otherwise, the input file will be overwritten, which will then result in an error. Yes I am writing from my experience. An oversight on the programmer's end I think.
As for the "Save as type:" parameter, set it to "MP4 +faststart (*.mp4)".
Compression type
Now under "Video", click on the "Change" button (next to the "Compression:" field). This will bring up the "Select video compression" dialog.

From the list, select "x264 8 bit - H.264/MPEG-4 AVC codec". Check the "Force keyframes every __ frames"; set its value to 15 (as in the input video, in my case).
H.264 Parameters
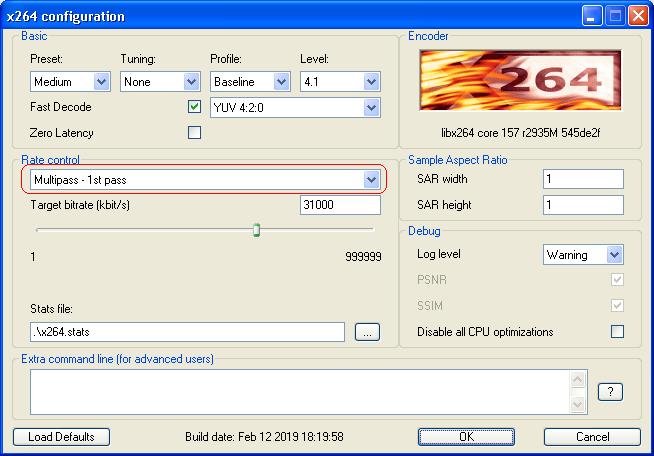
Now click on the "Configure" button to bring up the "x264 configuration" dialog box.

Using the video file that was recorded on my Canon Powershot SX530 HS and/or Canon EOS 800D/T7i as a guide, the parameters in this dialog box is set as above. The bit rate is set at 31000 kbits/s, which is slightly higher that what both my cameras produce.
Saving
1st Pass
Saving is a 2 stage process. In the first stage, select "Multipass - 1st pass" under rate control.
Click on "OK" to close the "x264 Configuration" dialog.
Click on "OK" to close the "Select video compression" dialog.
Click on "OK" to close the "Save File" dialog and to begin the first pass processing. Depending on your computer's CPU processing power, filters used and the video length, this will take at least 2 minutes or more.
2nd Pass
Once the 1st Pass is done, hit the F7 button again to bring up the "Save File" dialog.
Click on the "Change" button in the "Compression:" field under Video to bring up the "Select video compression" dialog.
With "x264 8 bit - H.264/MPEG-4 AVC codec" still selected, click on the "Configure" button to bring up the "x264 Configuration" dialog. Under "Rate control", now select "Multipass - Nth pass". Leave the other parameters unchanged.

Click on "OK" to close the "x264 Configuration" dialog.
Click on "OK" to close the "Select video compression" dialog.
Click on "OK" to close the "Save File" dialog. When prompted to replace the existing file, click on "Yes".
Now wait until the processing completes. Again, depending on your computer's CPU processing power, filters used and the video length, this will take at least 2 minutes or more.
And one last thing, open the VirtualDub2 processed video file in a media player to make sure that everything is satisfactory.
Buy refurbished computers from Amazon.com
(Note: An Amazon.com affilliate link)
0 comments:
Post a Comment